Shadowrocket Setup Guide
Import existing details, choose Global Routing, then check the connection and requests. Follow these five questions in order; there is no need to change every setting first.
Reading order: if you have a subscription link, use Subscribe; if you have details for a single server, add it manually. Complete either path, then follow the same connection checks.
Where do I enter server details?
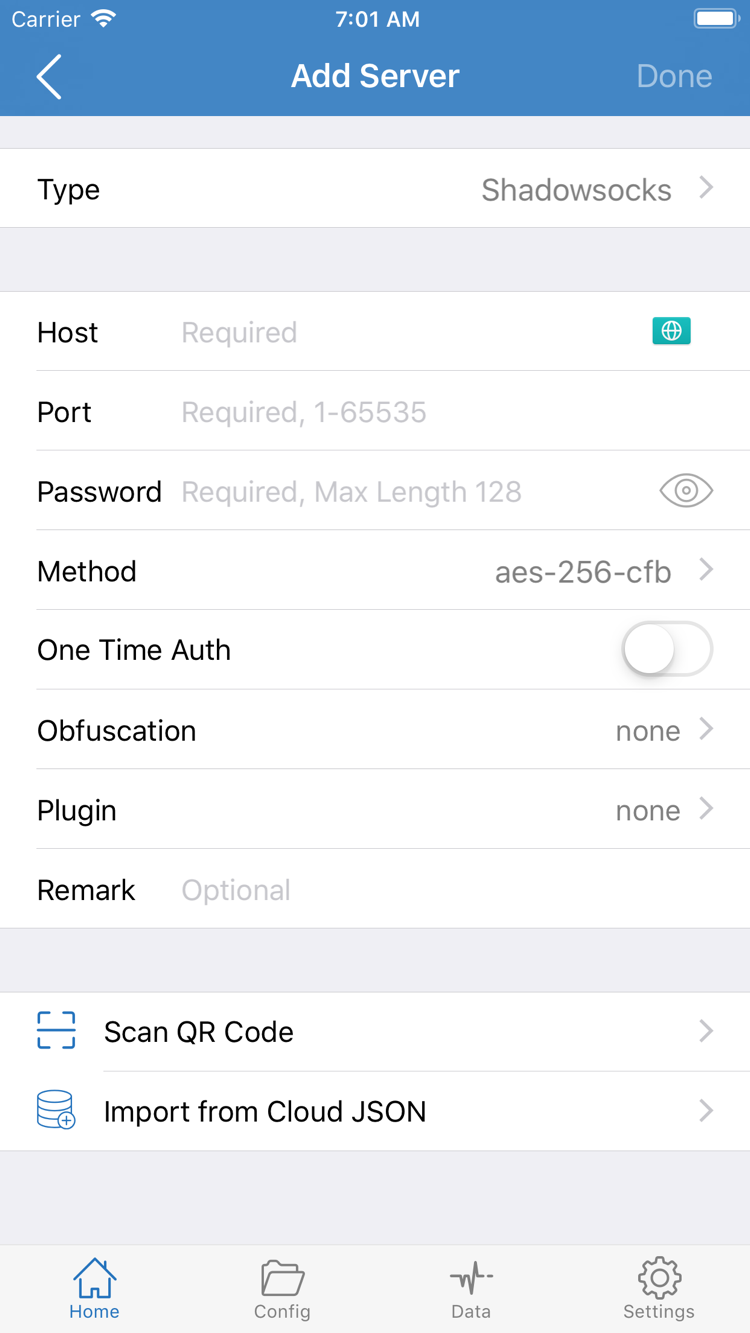
Open Add Server from Home. Subscription import and manual entry are two different ways to add details.
Identify the type of details you have before opening Add Server. An address used to update a server list is a subscription link. Details containing only fields such as Host, Port, and Password need to be entered manually according to the protocol. Do not enter a subscription link as Host, or use a single-server share as a subscription URL. If you are unsure what the details are for, ask your own service provider about the format rather than repeatedly trying unrelated Type options.
Existing subscription: Select Subscribe
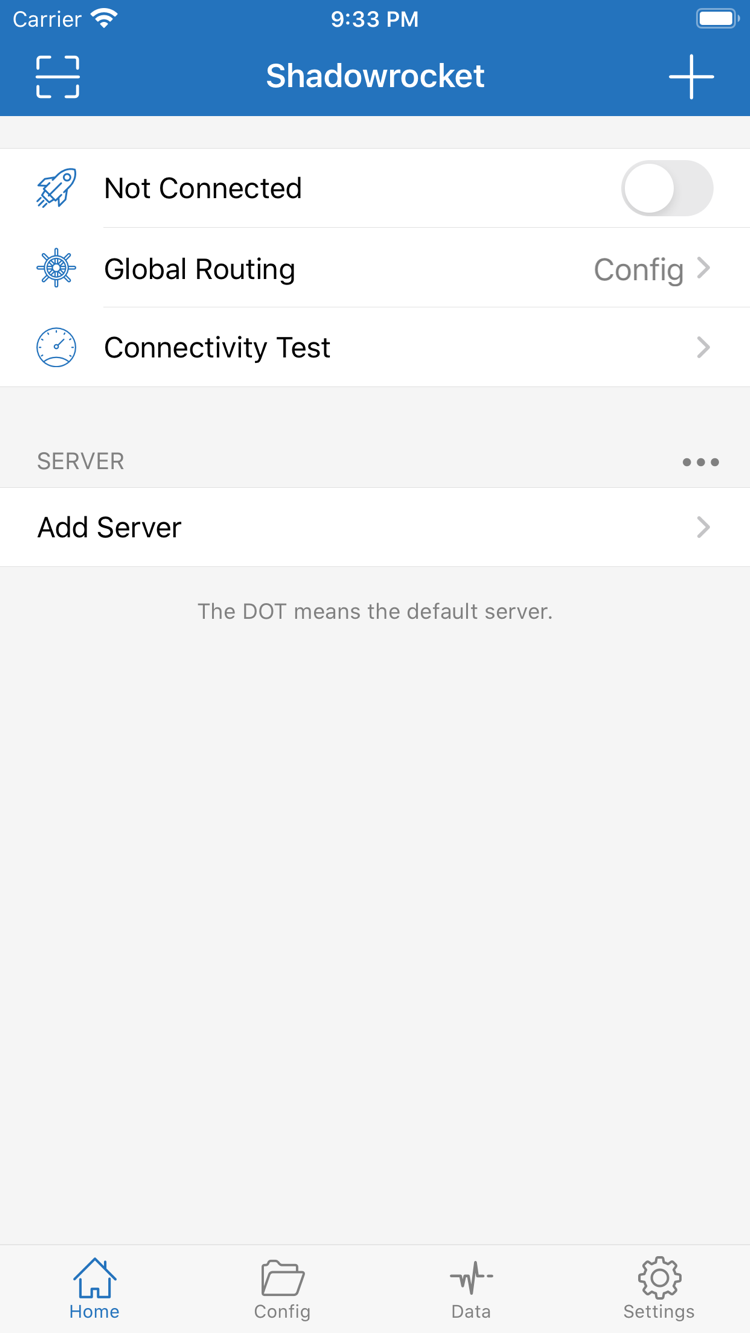
Open Shadowrocket, find Add Server in the SERVER section near the bottom of Home, or use the add option on the page to open Add Server. Open Type, choose Subscribe from the available types, and enter your complete subscription link in the corresponding URL field. A subscription URL may contain credentials. Keep all parameters intact when copying it, and avoid adding spaces, line breaks, or chat text at either end.
- Confirm that the URL came from your own service provider and that you copied the subscription link, not an account management webpage.
- Save the subscription as prompted. Return to Home and wait for the result; if needed, use the update action for that subscription entry.
- Expand the returned group and confirm that selectable server entries appear. If you see only the subscription name with no entries, resolve the update issue first.
Importing a subscription reads remote content; it does not replace all app settings. After import, check that the SERVER list is complete before continuing. If the URL cannot be updated, do not immediately buy the app again. First check that the link is valid, the original network works, and your service is still available.
Single existing server: Enter fields according to Type
Open Add Server from Home again. First select the Type that matches the original details, then fill in each field. For example, when the interface shows Host, Port, Password, and Method, enter the server address in Host, the specified port in Port, and the authentication details and encryption method in Password and Method. The fields vary by Type; do not copy the field order for one protocol to another.
Before saving, check capitalization, port, and authentication details character by character. If the original details specify TLS, SNI, or transport settings, enter those as instructed too. Do not switch protocols or encryption methods just to try them out. If you have a QR code, use Scan QR Code to read it. Import from Cloud JSON is another import option; use it only if your details are actually in that format. It is not needed to complete this tutorial.
After adding the details, do not immediately change DNS or open advanced options. First confirm how Global Routing handles requests. This helps distinguish an unavailable server from a different policy selected by the rules.
Which Global Routing mode should I choose?
For everyday rule-based routing, use Config. Proxy and Direct can help with comparison checks.
Global Routing determines how requests are handled; it does not supply missing server details. Return to Home and open Global Routing to check the selected option. Config, Proxy, and Direct respectively mean routing according to the configuration, using the proxy route, and connecting directly. Choose a mode, return to Home, and continue. Do not confuse the mode names with the Config page at the bottom: the former selects a routing mode, while the latter manages configuration files.
| Mode | For this getting-started guide | What it tells you |
|---|---|---|
| Config | Use it to check rule routing when you have a trusted configuration. | Results depend on the current configuration and match order. |
| Proxy | Use it to check the selected proxy connection on its own. | It does not guarantee a working connection; verify actual requests too. |
| Direct | Use it as a comparison against the regular network. | A page loading does not mean it went through the selected proxy. |
Config: Check the current configuration first
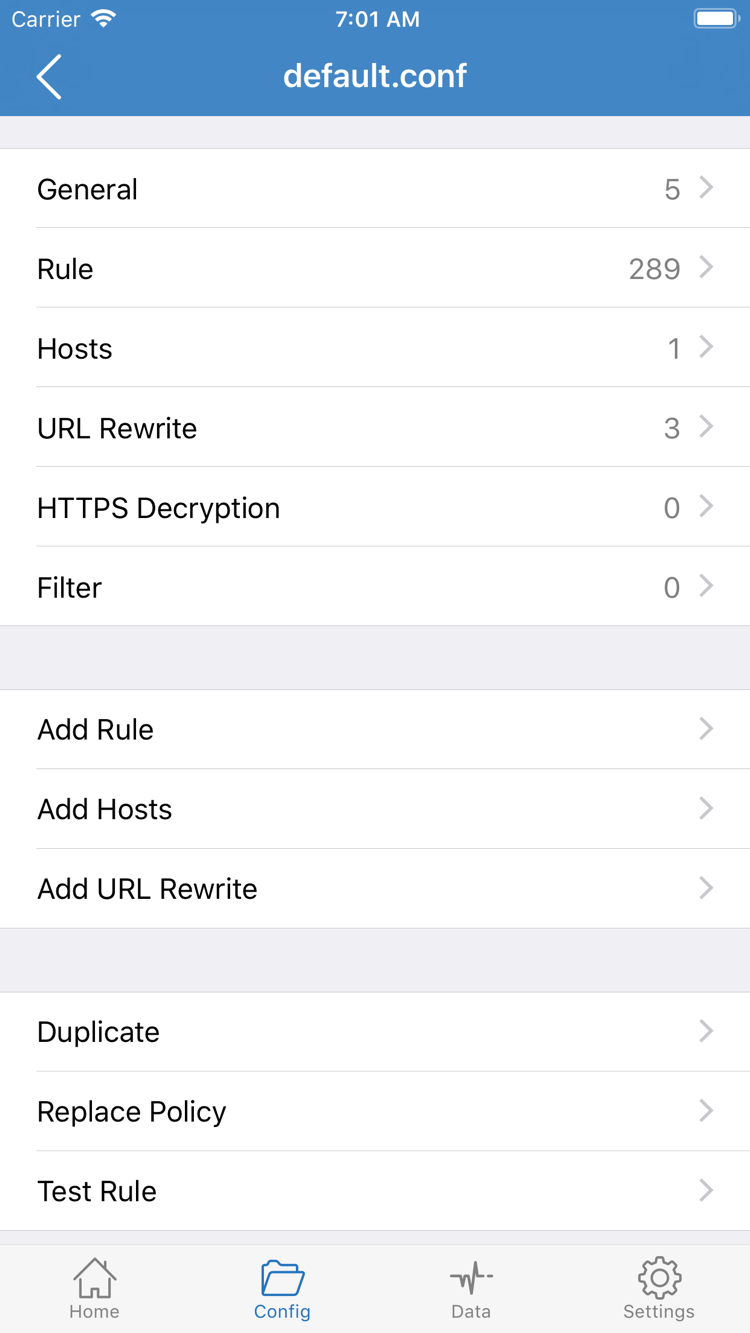
Switch to Config, confirm which configuration file is in use, then open it to view or edit. General, Rule, Hosts, URL Rewrite, and HTTPS Decryption in the official screenshot are separate settings sections. For a first look, just learn where they are; there is no need to open or change each one. Open Rule to view rules; Add Rule adds a rule. The server list in a subscription and the rules in a configuration file serve different purposes. Updating the former does not mean the latter is already set up for your needs.
Rules are generally matched in order, and the first match determines the policy. Place more specific domain conditions appropriately. FINAL handles requests that do not match earlier conditions. The example below shows rule syntax; it is not a recommended list to paste over your entire existing configuration. Whether PROXY is a valid policy depends on its actual definition in the current configuration.
DOMAIN-SUFFIX,example.com,PROXY
GEOIP,CN,DIRECT
FINAL,PROXY
DIRECT means connect directly; REJECT means reject the request; PROXY refers to a proxy policy in the configuration. If no rule matches a domain, the request may continue to later conditions. Therefore, having a domain in the list does not guarantee that the corresponding rule will be used. When troubleshooting, check rule position, policy name, and request records, not just one line of text.
Keep settings you can explain
If you have not confirmed the configuration contents, first use Proxy to check the server you added, then switch back to Config and compare. Do not add rules, change Hosts, and enable HTTPS Decryption all at once; changing multiple variables makes it difficult to identify the cause. After comparing, restore the mode that suits your everyday use. For configuration file management and more detailed rule guidance, first use the troubleshooting steps on this page to narrow down the issue, then continue with the relevant topic in the official manual.
How do I connect to the VPN?
Select a server, then turn on the switch at the top of Home. The first connection requires handling a system permission prompt.
After selecting an actual server in Home, turn on the switch next to Not Connected at the top. Confirm that the selected item in SERVER is the entry you just checked, not just a subscription group name. Check that Global Routing is set to the mode you prepared for the previous test. Not Connected in the screenshot indicates the connection was off when it was taken; it is not a setting value to enter manually.
- Return to Home and select the server to test in the SERVER list. If there are many details, select just one entry with verified parameters for now.
- Turn on the connection switch at the top of Home and watch for a system prompt to add a VPN configuration.
- Confirm that the prompt is for Shadowrocket and allow the configuration to be added. Complete device authentication as required by the system, then return to the app.
- Check whether the connection remains stable. If the switch turns off immediately, note the prompt text and avoid toggling it rapidly over and over.
Allowing a VPN configuration is a system step required to establish a VPN connection on this device. It does not generate a subscription or authentication details for you. If you accidentally tapped Cancel the first time, turn on the connection switch again and follow the prompt. If the prompt does not appear again, check the configuration status in the VPN section of system settings. If device management policies restrict access, ask the device administrator about permissions; changing a server password will not resolve a system permission issue.
Start with a manual connection
For the first test, turn the connection on and off manually; do not enable On Demand yet. On Demand triggers a connection according to its configured conditions and is best set up after the basic connection works. If you do not understand its conditions, the connection may come back after you turn it off manually, which can look like a faulty switch. If another VPN connection is in use, check which configuration is actually active so you do not mistake its status for Shadowrocket's.
This step is complete when the system allows the configuration and the app shows that a connection has been established. This confirms only that the device connection flow completed; the switch alone cannot confirm that the remote server works. Continue to the next step to verify actual requests. If the connection will not stay on, go directly to troubleshooting and check permissions and entry details first.
How can I confirm the connection is working?
Check system status, Connectivity Test, and real-world access separately. Do not rely on a single result for the whole diagnosis.
Whether a connection is established, a server responds, and requests use the right policy are three different questions. First confirm that Wi-Fi or cellular data works with the connection off. Then connect in Shadowrocket and visit a website you normally use. If the regular network still requires a sign-in, or the device has no network at all, resolve that first before checking the app.
Test the entry, then test actual requests
Return to Home and use Connectivity Test to check the current server. The result is affected by settings such as Test Method in Settings. A completed test does not mean all websites and apps will work, and a failed test does not prove the subscription URL is invalid. Compare the result for the same server with actual access rather than changing every parameter as soon as the test finishes.
Next, open a familiar page and check whether it finishes loading, rather than displaying only cached content. To inspect new requests, reload the page and then look for the corresponding records in Data. Check the target domain and any policy information shown by the app. If the record does not include a particular field, do not infer that a specific rule matched based only on the connection icon.
Compare modes to narrow down the cause
If access works in Proxy but fails in Config, check the current configuration and Rule first instead of immediately deleting the server. If Direct works but Proxy fails, check the selected server and service status. Change only one condition at a time, keeping the server, target page, and network environment as consistent as possible so the results can be compared.
- System: The connection switch stays on and the system VPN configuration shows the corresponding status.
- Connection: The selected server passes its test, or an actual request completes through it.
- Rules: Request records in Config match the expected policy.
The exit address shown by a browser reflects only that request; it does not mean every app uses the same route. Different domains may match different rules, and a single page may request multiple resources. If only images or one feature fail, keep the records for the affected destination and continue troubleshooting; do not describe a partial failure as “nothing connects.”
Where should I start when a connection fails?
Troubleshoot by failure stage. Keep the original configuration and change only one condition at a time.
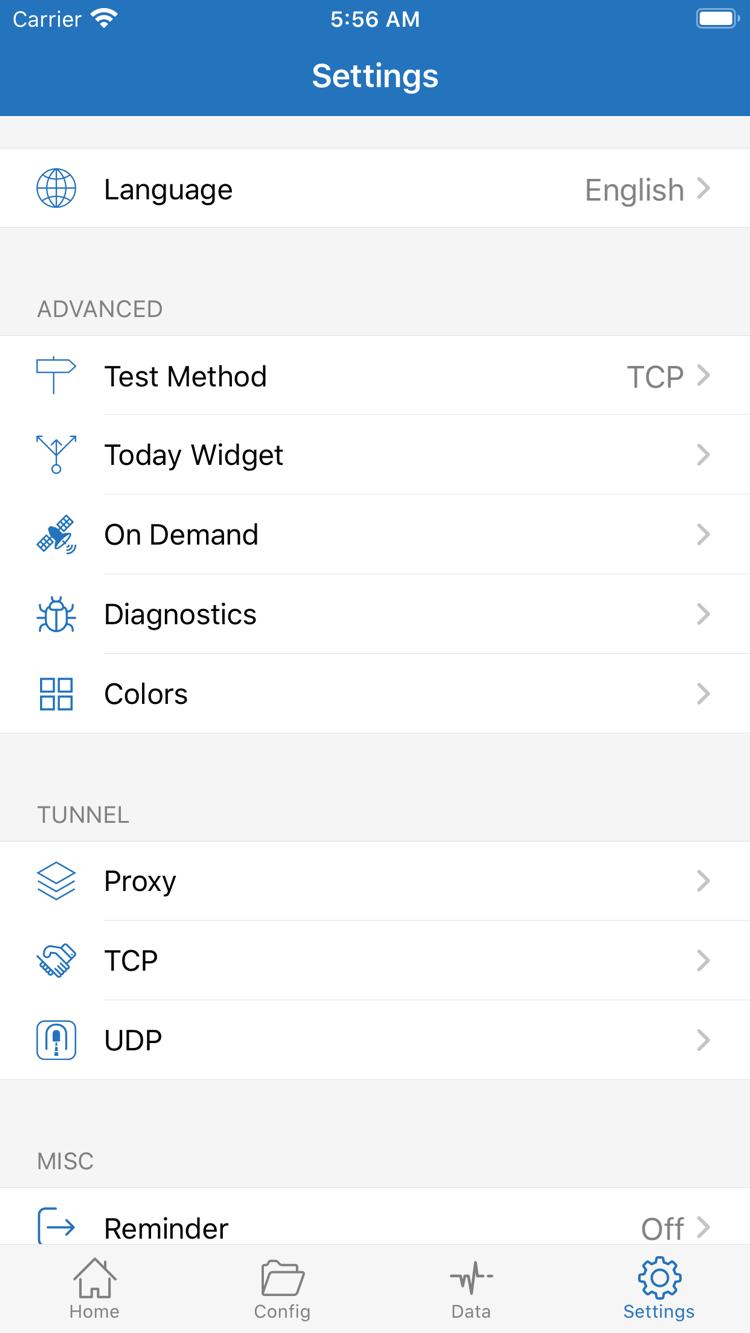
Identify the stage where the failure occurs before opening related settings. Language, Test Method, On Demand, Diagnostics, Proxy, TCP, and UDP in Settings serve different purposes; you do not need to change all of them to troubleshoot. Keep a copy of the current configuration or note the original values before making targeted checks. Exported configurations may contain credentials, so store them securely.
Subscription will not update: Check the link and regular network
If Subscribe does not return actual entries after saving, first check whether the complete URL was truncated, whether you copied an account page by mistake, and whether the link is still valid. Confirm that the device can connect to the internet while disconnected, then try updating once more and note the specific error. Ask your own service provider about authentication or service status. Do not post a complete link containing credentials in a public Q&A area, or use Global Routing changes to mask the fact that the subscription has not yet been imported.
Entry appears, but will not connect: Check the details field by field
Open the entry's edit page and check Type, Host, Port, and authentication fields against the original details, then check the transport parameters required by the protocol. For subscription entries, update before testing so that you do not unknowingly lose manual changes in a later update. If all entries fail on the same network, compare using another network you are authorized to use. If only one entry fails, focus on that entry and the status of its remote service.
Switch turns off immediately: Check permissions and system prompts first
Check whether the system allows a VPN configuration to be added and whether another VPN configuration is currently in use. Note the error text from the app or system, then check Diagnostics in Settings for available diagnostic information. Diagnostics may contain domains, addresses, and request records; redact sensitive information before sharing it with support staff. A system permission failure and a server authentication failure occur at different stages. Repeatedly switching Method is not a substitute for checking permissions.
VPN connects but pages will not load: Check the mode and requests
Return to Global Routing and compare Config with Proxy using the verification steps on this page. If only Config fails, check Rule order, policy references, and the final handling rule. If all proxy requests fail, check the server first. If domain-related requests behave unexpectedly, use the visible records to check DNS settings. Do not clear Hosts, change DNS, and reset the configuration all at once as soon as you see a page error; doing so removes the baseline needed for comparison.
Test results differ from app behavior: Check Test Method
Check Test Method in Settings to understand which connection conditions the current test measures. Some services depend on UDP; a regular webpage loading does not mean those services are available. Likewise, a failed test does not necessarily mean that all TCP page requests fail. Check the Proxy, TCP, and UDP options against the server's capabilities, current configuration, and specific service. Do not apply parameters that are unrelated to your protocol.
Connection comes back after turning it off: Check On Demand
If the connection returns after you turn it off manually, check whether On Demand is enabled in Settings and whether its current conditions will trigger another connection. Temporarily disabling automatic triggers before a manual test helps distinguish automatic connection behavior from a network issue. Once the basic connection is stable, restore the on-demand conditions that suit your needs. There is no need to keep automation settings you do not yet understand for this getting-started test.
If the cause is still unclear, note where the failure occurred, which mode you used, the error text, whether only one server entry is affected, and whether the result changes on another network. For account and store purchase questions, continue to the acquisition guide. To check the installation channels again, visit the app download page. Do not start by deleting every entry or uninstalling the app, as you may lose details that could help with comparison.